Friday, May 1, 2015

Ionic android-22 Ubuntu 15.04 IonicBox Installation Guide


Ionic Box

Ionic Box is a ready-to-go hybrid development environment for building mobile apps with Ionic, Cordova, and Android. Ionic Box was built to make it easier for developers to build Android versions of their app, and especially for Windows users to get a complete dev environment set up without all the headaches.

 To install, download and install Vagrant for your platform, then download and install VirtualBox.

Use Pre-built image

We are testing a pre-built Vagrant cloud image which should be faster than using the Vagrantfile method above. To try it, create a folder where you want to init your dev environment (a great place for this would be in the project folder of your app). Then run:
 
          $ mkdir IonicBox
          $ cd IonicBox
          $ vagrant init drifty/ionic-android
          $ vagrant up
          $ sudo apt-get update
          $ sudo  android-sdk-linux/tools/android update sdk -u --all --filter platform-tool,android-22,build-tools

exit from Vagrant machine via 
 
      $ vagrant halt.

Alter your Vagrantfile as given below.

# -*- mode: ruby -*-
# vi: set ft=ruby :

# Vagrantfile API/syntax version. Don't touch unless you know what you're doing!
VAGRANTFILE_API_VERSION = "2"

Vagrant.configure(VAGRANTFILE_API_VERSION) do |config|
  # All Vagrant configuration is done here. The most common configuration
  # options are documented and commented below. For a complete reference,
  # please see the online documentation at vagrantup.com.

  # Every Vagrant virtual environment requires a box to build off of.
  config.vm.box = "drifty/ionic-android"
  config.vm.provider "virtualbox"
  # Disable automatic box update checking. If you disable this, then
  # boxes will only be checked for updates when the user runs
  # `vagrant box outdated`. This is not recommended.
  # config.vm.box_check_update = false

  # Create a forwarded port mapping which allows access to a specific port
  # within the machine from a port on the host machine. In the example below,
  # accessing "localhost:8080" will access port 80 on the guest machine.
  # config.vm.network "forwarded_port", guest: 80, host: 8080

  # Create a private network, which allows host-only access to the machine
  # using a specific IP.
  # config.vm.network "private_network", ip: "192.168.33.10"

  # Create a public network, which generally matched to bridged network.
  # Bridged networks make the machine appear as another physical device on
  # your network.
   config.vm.network "public_network"

  # If true, then any SSH connections made will enable agent forwarding.
  # Default value: false
  # config.ssh.forward_agent = true

  # Share an additional folder to the guest VM. The first argument is
  # the path on the host to the actual folder. The second argument is
  # the path on the guest to mount the folder. And the optional third
  # argument is a set of non-required options.
   config.vm.synced_folder "/home/rajeev/IonicBox/testApp", "/home/vagrant/ionicApps/testApp/"

  # Provider-specific configuration so you can fine-tune various
  # backing providers for Vagrant. These expose provider-specific options.
  # Example for VirtualBox:
  #
   config.vm.provider "virtualbox" do |vb|
   #   # Don't boot with headless mode
   #   vb.gui = true
   #
   #   # Use VBoxManage to customize the VM. For example to change memory:
   #   vb.customize ["modifyvm", :id, "--memory", "1024"]
 vb.customize ["usbfilter", "add", "0", "--target", :id, "--name", "android", "--vendorid", "0x22b8"]
   end
#
vender_id depands on your Mobile Provider. see
  # View the documentation for the provider you're using for more
  # information on available options.

  # Enable provisioning with CFEngine. CFEngine Community packages are
  # automatically installed. For example, configure the host as a
  # policy server and optionally a policy file to run:
  #
  # config.vm.provision "cfengine" do |cf|
  #   cf.am_policy_hub = true
  #   # cf.run_file = "motd.cf"
  # end
  #
  # You can also configure and bootstrap a client to an existing
  # policy server:
  #
  # config.vm.provision "cfengine" do |cf|
  #   cf.policy_server_address = "10.0.2.15"
  # end

  # Enable provisioning with Puppet stand alone.  Puppet manifests
  # are contained in a directory path relative to this Vagrantfile.
  # You will need to create the manifests directory and a manifest in
  # the file default.pp in the manifests_path directory.
  #
  # config.vm.provision "puppet" do |puppet|
  #   puppet.manifests_path = "manifests"
  #   puppet.manifest_file  = "default.pp"
  # end

  # Enable provisioning with chef solo, specifying a cookbooks path, roles
  # path, and data_bags path (all relative to this Vagrantfile), and adding
  # some recipes and/or roles.
  #
  # config.vm.provision "chef_solo" do |chef|
  #   chef.cookbooks_path = "../my-recipes/cookbooks"
  #   chef.roles_path = "../my-recipes/roles"
  #   chef.data_bags_path = "../my-recipes/data_bags"
  #   chef.add_recipe "mysql"
  #   chef.add_role "web"
  #
  #   # You may also specify custom JSON attributes:
  #   chef.json = { mysql_password: "foo" }
  # end

  # Enable provisioning with chef server, specifying the chef server URL,
  # and the path to the validation key (relative to this Vagrantfile).
  #
  # The Opscode Platform uses HTTPS. Substitute your organization for
  # ORGNAME in the URL and validation key.
  #
  # If you have your own Chef Server, use the appropriate URL, which may be
  # HTTP instead of HTTPS depending on your configuration. Also change the
  # validation key to validation.pem.
  #
  # config.vm.provision "chef_client" do |chef|
  #   chef.chef_server_url = "https://api.opscode.com/organizations/ORGNAME"
  #   chef.validation_key_path = "ORGNAME-validator.pem"
  # end
  #
  # If you're using the Opscode platform, your validator client is
  # ORGNAME-validator, replacing ORGNAME with your organization name.
  #
  # If you have your own Chef Server, the default validation client name is
  # chef-validator, unless you changed the configuration.
  #
  #   chef.validation_client_name = "ORGNAME-validator"
end
 
after that do 
                         $ vagrant reload
 
Attach your Device Moto-G in my case run 
 
vagrant@ionic-android:~$ sudo /home/vagrant/android-sdk-linux/platform-tools/adb devices
* daemon not running. starting it now on port 5037 *
* daemon started successfully *
List of devices attached 
YourDevice device 
 
   $ vagrant ssh 
   $ sudo npm update -g ionic
   $ sudo npm update -g cordova
   $ mkdir -p ionicApps/testApp
   $ cd /home/vagrant/ionicApps/testApp
   $ ionic start testApp sidemenu
   $ cd testApp/
   $ ionic plugin add https://github.com/apache/cordova-plugin-whitelist.git ## Very Important 
 $ ionic platform add android
   $ ionic run android -lcs
 
Thats it!! Enjoy! 

Friday, April 24, 2015

Oauth2 Doorkeeper WorkFlow

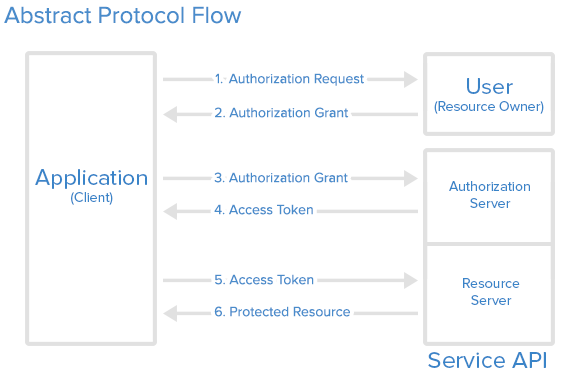
An Introduction to OAuth 2
 
Introduction

OAuth 2 is an authorization framework that enables applications to obtain limited access to resources on an HTTP service,
such as Facebook, GitHub, and DigitalOcean. It works by delegating user authentication to the service that hosts the
resource, and authorizing third-party applications to access the resource. OAuth 2 provides authorization flows for web
and desktop applications, and mobile devices.
 
OAuth Roles
    OAuth defines four roles:

        * Resource Owner
        * Client
        * Resource Server
        * Authorization Server

We will detail each role in the following subsections.
 
 
Resource Owner: User

The resource owner is the user(resource) who authorizes an application to access their account. The application's access
to the user's account is limited to the "scope" of the authorization granted (e.g. read or write access).
 
Resource / Authorization Server: API

The resource server hosts the protected user accounts, and the authorization server verifies the identity of the user
then issues access tokens to the application. From an application developer's point of view, a service's API fulfills
both the resource and authorization server roles. We will refer to both of these roles combined, as the Service or API role.
 
Client: Application

The client is the application that wants to access the user's account. Before it may do so, it must be authorized by the
user, and the authorization must be validated by the API.
 
Abstract Protocol Flow

Now that you have an idea of what the OAuth roles are, let's look at a diagram of how they generally interact with each other:

Labels: ,

Friday, January 30, 2015

Ionic Auto-Generate Icons and Splashscreens

Ionic is a powerful HTML5 native app development framework that helps you build native-feeling mobile apps all with web technologies like HTML, CSS, and Javascript. Even though a custom splash screen is an important way to polish your app, it may not be enough. For applications that download a lot of data, or perform other operations, more control might be necessary over the display and hiding of the splash screen.Cutting images for icons and splash screen is not too easy task.

With the new ionic CLI, all you need is a resource directory and two images.

$ ionic start newApp blank
$ cd newApp
$ cordova plugin add org.apache.cordova.splashscreen
$ mkdir  resources

Let's have some image processing work. you will need two images

1. icon(.png/.psd/.ai) of Size --> 192x192
2. splashscreen(.png/.psd/.ai) --> 2208x2208

For easy you can use imageMagick
$ convert splashscreen.png -resize 2208x2208 splashscreen.png
  
$ ionic resources
$ ionic platform add android/ios
$ ionic build android/ios

After the images are generated, the CLI will update the config.xml to include the icons and splash screens, so they will be transferred over in Cordova's build process. NOTE: This process requires Cordova CLI version 3.6 or higher. If you only need to update one of the resources, or you only want to generate icons and not both, the ionic resources command has two flags that allow you to target each asset, instead of generating both. Icon image should not already come with rounded corners.
 
$ ionic resources --icon
$ ionic resources --splash


Labels: , ,

Friday, December 26, 2014

RubyMine Fix: inotify(7) watch limit is too low


Every time on fresh ubuntu system i use Ruby-Mine it shows me an ugly balloon saying

inotify(7) watch limit is too low

due to rapid changes made by VCS, or build tools, or code generators etc. Ruby-Mine spins background process to monitor such changes. The method it uses is platform-specific; and on Linux it is Inotify facility.

To Fix that balloon paste following to your /etc/sysctl.conf

        ##### Fix: inotify(7) watch limit is too low  #####                   
                    fs.inotify.max_user_watches = 524288

Then run this command to apply the change:
                                 sudo sysctl -p
And don't forget to restart your IDE.

Labels: , ,

Saturday, November 22, 2014

Ionic Geolocation Using ngCordova

Step 1  Run from your terminal

bower install ngCordova

Step 2 Add this to your index.html

    <!-- cordova script (this will be a 404 during development) -->
    <script src="lib/ngCordova/dist/ng-cordova.js"></script>

Just above to 

    <script src="cordova.js"></script>
 
Step 3  Run from your terminal

       cordova plugin add org.apache.cordova.geolocation


Step 4 Add this to your services.js

    .factory('$localStorage', ['$window', function ($window) {
        return {
            set: function (key, value) {
                $window.localStorage[key] = value;
            },
            get: function (key, defaultValue) {
                return $window.localStorage[key] || defaultValue;
            },
            setObject: function (key, value) {
                $window.localStorage[key] = JSON.stringify(value);
            },
            getObject: function (key) {
                return JSON.parse($window.localStorage[key] || '{}');
            }
        }
    }])
    .factory('geoLocation', function ($localStorage) {
        return {
            setGeolocation: function (latitude, longitude) {
                var _position = {
                    latitude: latitude,
                    longitude: longitude
                }
                $localStorage.setObject('geoLocation', _position)
            },
            getGeolocation: function () {
                return glocation = {
                    lat: $localStorage.getObject('geoLocation').latitude,
                    lng: $localStorage.getObject('geoLocation').longitude
                }
            }
        }
    })


Step 5 : Add this to your app.js

    .run(function ($ionicPlatform, $ionicPlatform, $cordovaGeolocation, geoLocation) {

        $ionicPlatform.ready(function () {
            // Hide the accessory bar by default (remove this to show the accessory bar above the keyboard
            // for form inputs)
            if (window.cordova && window.cordova.plugins.Keyboard) {
                cordova.plugins.Keyboard.hideKeyboardAccessoryBar(true);
            }
            if (window.StatusBar) {
                // org.apache.cordova.statusbar required
                StatusBar.styleDefault();
            }

            $cordovaGeolocation
                .getCurrentPosition()
                .then(function (position) {
                    geoLocation.setGeolocation(position.coords.latitude, position.coords.longitude)
                }, function (err) {
                    geoLocation.setGeolocation(37.38, -122.09)
                });

            // begin a watch
            var options = {
                frequency: 1000,
                timeout: 3000,
                enableHighAccuracy: true
            };

            var watch = $cordovaGeolocation.watchPosition(options);
            watch.promise.then(function () { /* Not  used */
                },
                function (err) {
                    geoLocation.setGeolocation(37.38, -122.09)
                }, function (position) {
                    geoLocation.setGeolocation(position.coords.latitude, position.coords.longitude)
                });

        });

    })

Step 5 : Include geoLocation service to your controller and use        

               geoLocation.getGeolocation()

Step 6 :  Enjoy!!!

Labels: , ,

Saturday, November 15, 2014

Ionic GoogleMaps Directive

Step 1. Add this to your index.html file.

 <script src="https://maps.googleapis.com/maps/api/js?key=AIzaSyB16sGmIekuGIvYOfNoW9T44377IU2d2Es&sensor=true"></script>

Step 2. Add this to your directive.js file.


   .directive('map', function () {
        return {
            restrict: 'E',
            scope: {
                onCreate: '&'
            },
            link: function ($scope, $element, $attr) {
                var directionDisplay;
                var directionsService = new google.maps.DirectionsService();

                function initialize() {
                    var latlng = new google.maps.LatLng(51.764696,5.526042);
                    directionsDisplay = new google.maps.DirectionsRenderer();

                    var mapOptions = {
                        zoom: 8,
                        center: latlng,
                        mapTypeId: google.maps.MapTypeId.ROADMAP,
                        mapTypeControl: false

                    };
                    var map = new google.maps.Map($element[0], mapOptions);
                    directionsDisplay.setMap(map);
                    directionsDisplay.setPanel(document.getElementById("directionsPanel"));
                    var marker = new google.maps.Marker({
                        position: latlng,
                        map: map,
                        title:"My location"
                    });

                    $scope.onCreate({map: map});
                    // Stop the side bar from dragging when mousedown/tapdown on the map
                    google.maps.event.addDomListener($element[0], 'mousedown', function (e) {
                        e.preventDefault();
                        return false;
                    });

                    calcRoute();
                }

                function calcRoute() {
                    var start = "28.6100,77.2300";
                    var end = "37.38, -122.09";
                    var request = {
                        origin: start,
                        destination: end,
                        travelMode: google.maps.DirectionsTravelMode.DRIVING
                    };
                    directionsService.route(request, function (response, status) {
                        if (status == google.maps.DirectionsStatus.OK) {
                            directionsDisplay.setDirections(response);
                        }
                    });
                }

                if (document.readyState === "complete") {
                    initialize();
                } else {
                    google.maps.event.addDomListener(window, 'load', initialize);
                }
            }
        }
    });


Step 3. Add this to your style.css file.

map {
    display: block;
    width: 100%;
    height: 100%;
}

.scroll {
    height: 100%;
}
.profile-info-right p {
    max-width: 185px;
}

And finally  to your template :-

        <map on-create="mapCreated(map)"></map>

Friday, November 14, 2014

fake SMTP Mailtrap

Mailtrap

is a fake SMTP server for development teams to test, view and share emails sent from the development and staging environments without spamming real customers.

Mailtrap is a solution that allows testing email notifications without sending them to the real users of your application. It also lets you view all your emails online, forward them to your regular mailbox, share with the team and more!
Mailtrap is a product built by Railsware, a premium software development consulting company.

Integration: 

Simply specify Mailtrap as an SMTP server in your application's settings (either QA or development environments) and track all your e-mail notifications online.
 

Features: 

  1. Extremely easy to set up:
    • no need to tune your mail server;
    • no need to clean up your database from the customers' email addresses;
    • no need to make any special tweaks in your application code.
  2. Can be used for both development and staging purposes.
  3. Is platform-independent. Since Mailtrap uses SMTP (not some special platform-dependant libraries), you can use it with any programming language and framework.
  4. Built-in goodies for web developers.

Mailtrap renders emails in the same way browsers do, which means no additional stylesheet or CSS reset is applied by default. This makes Mailtrap 99% Gmail/Hotmail/Yahoo Mail compatible, since all of these mail clients are rendering the same way.

The max size of an email including attachments is 5MB. Exceeding this limit causes the error: '552 5.3.4 Error: message too big'

The SMTP rate limit is 3 emails per second for inbox. Exceeding this limit causes the error: '550 5.7.0 Requested action not taken: too many emails per second'